FACEBOOK TWITTER PINTEREST INSTAGRAM RSS BLOGLOVIN

Tuesday, August 25, 2015

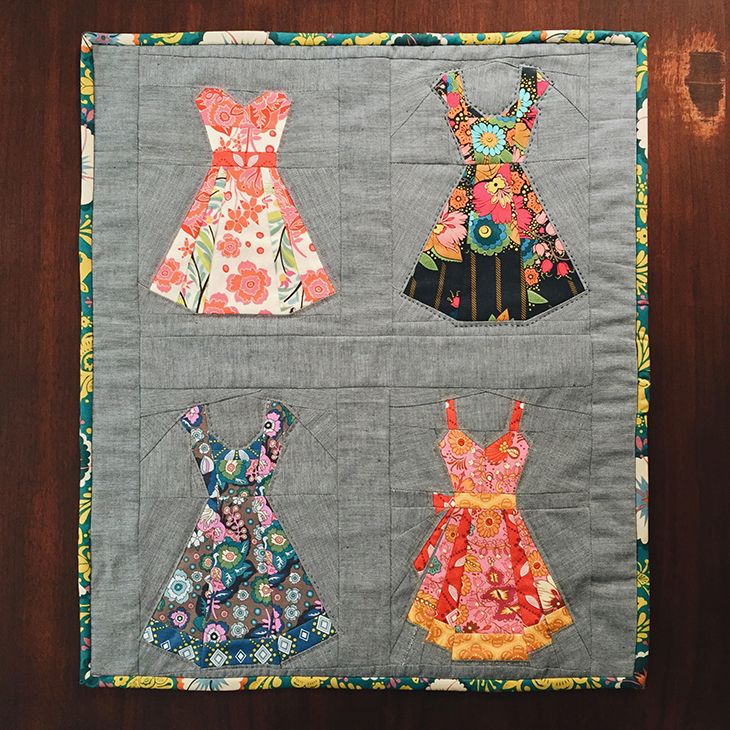
My Mini for the #amhminiquiltswap


For my second quilt swap, I got a little more ambitious.  I fell in love with this vintage dress pattern and thought it would be perfect for the Anna Maria Horner florals.  I had so much fun coordinating the fabrics, fussy cutting the prints and building these darling little dresses.  The quilting was a simple hand stitch in a matching color a quarter inch outside of the dress outline. 

While the background was pretty on the roll, I would never use it again.  It's not a quilting fabric, and it had so much flex.  It was nearly impossible to work with for paper piecing.  I much prefer Essex Yarn Dyed in Black for a similar look that sews and presses really cleanly.

Pattern: Vintage Dresses by Charise Creates
Background:  Woven Cotton Shirting from Joann's (not available online)
Prints:  Anna Maria Horner "Folk Song" Collection from Alewives Fabrics
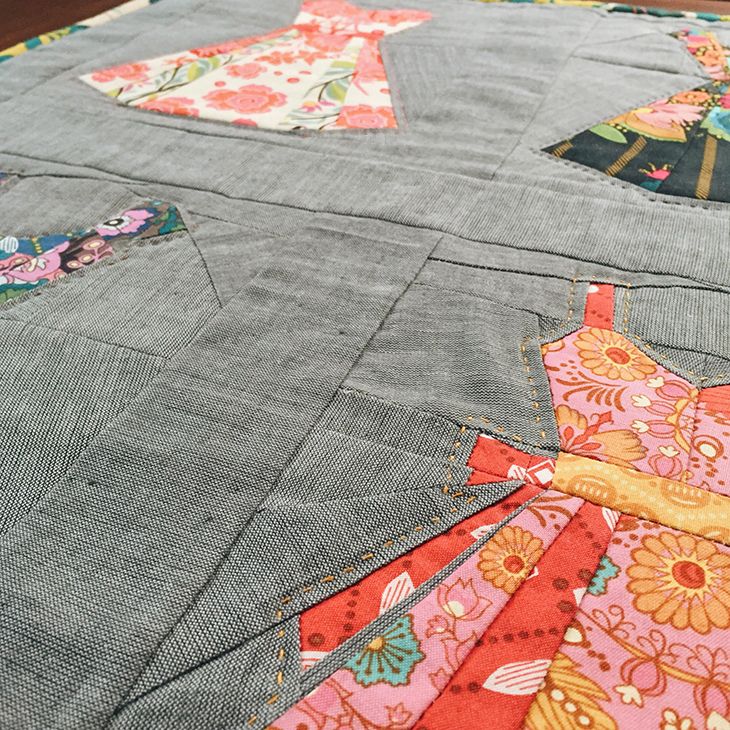


I love the way it turned out despite the troubles I had with the background.  I am planning to use the pattern many times in the future for personal projects and gifts.  It's easy to follow and makes a very impressive block that is guaranteed to make the recipient swoon.

My other swaps are still in progress but I can't wait to share the finished products with you after my partner receives them.  I'll have more very soon.  be sure to follow me on Instagram to see progress on my current swap.  Are you doing any swaps this year?

Friday, August 21, 2015

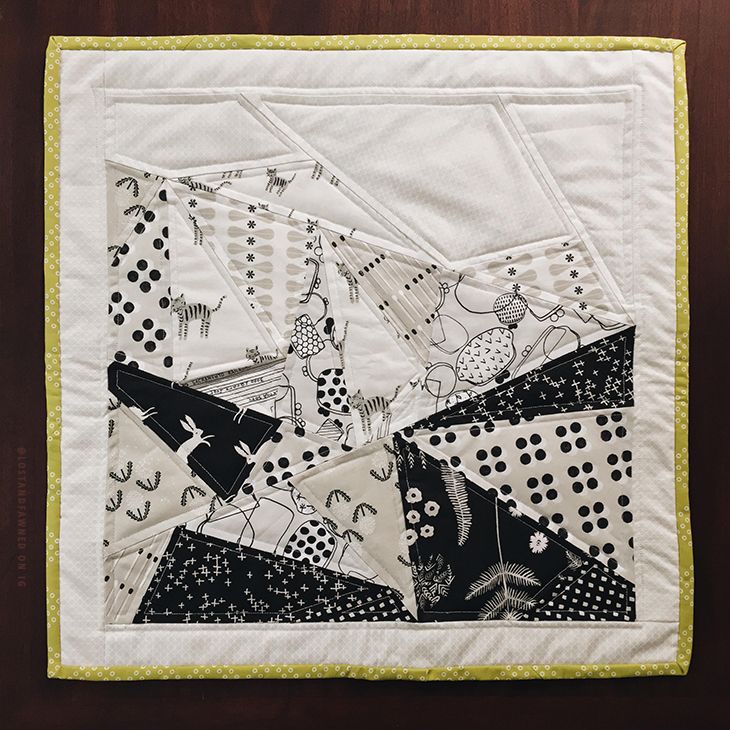
My Mini Quilt for the #cottonandsteelminiquiltswap


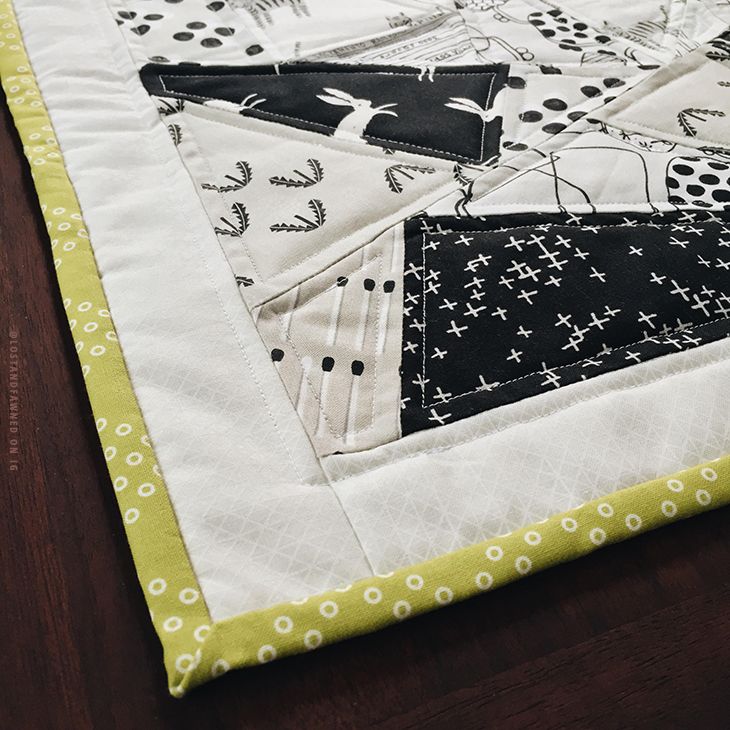
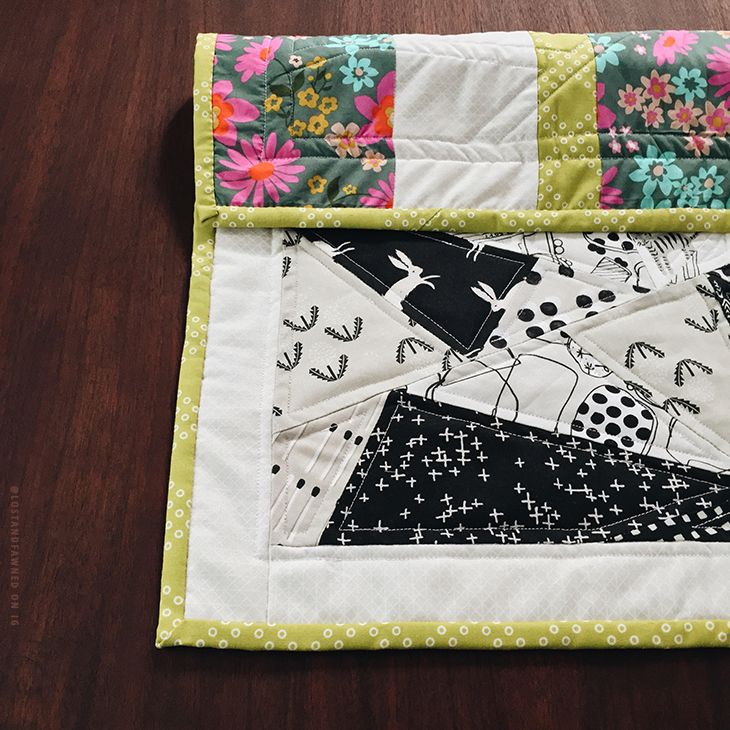
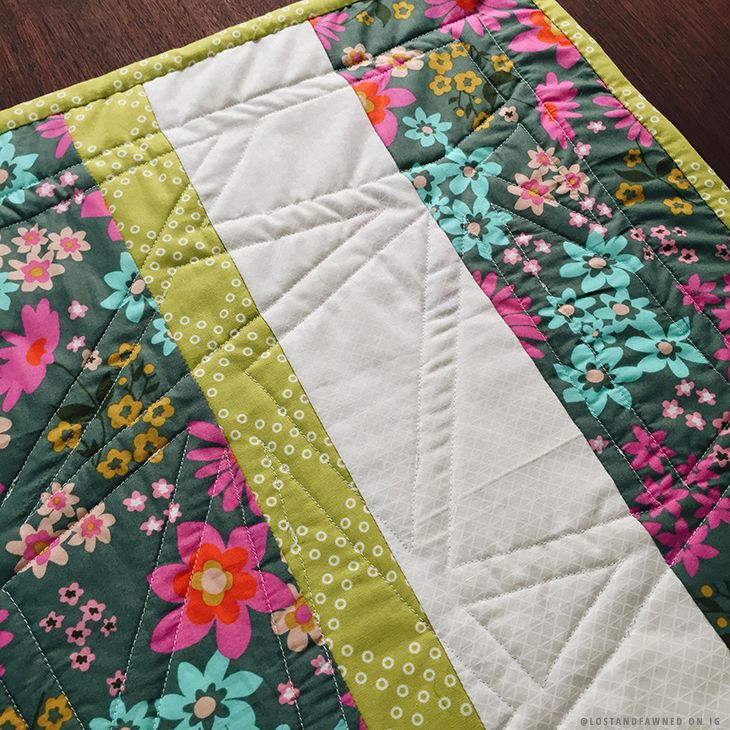
I'm back to reveal the finished product of my very first quilt swap!  Earlier this summer I shared the plan with you.  I stayed pretty true to the original idea.  I did end up adding a border and added some strips to the back to make it wide enough.  I love the way it ended up looking!  And my partner loved it too. 

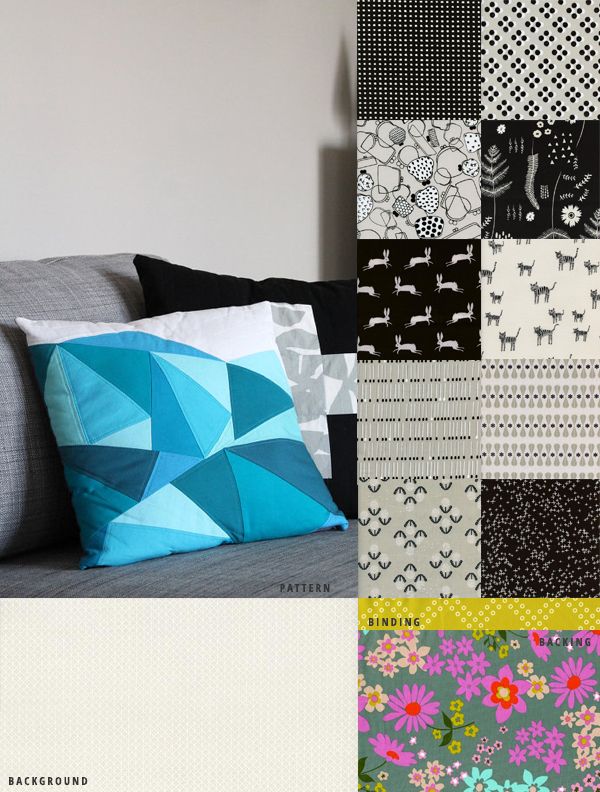
Pattern:  Geometric Mountain Range by Art School Dropout
Top Fabrics:  Black & White Collection by Cotton + Steel
Backing Fabric:  Vintage Floral in Aqua by Cotton + Steel
Binding Fabric:  Dotti's Cousin in Lime by Cotton + Steel


Since the front was fairly monochromatic, I really wanted the back to pop.  I used a cotton voile by Melody Miller (my swap buddy's favorite designer) and added a couple of panels to make it fit the width.  I love the top, but the back turned out awesome.  I love the texture of the quilting over the graphic back. 


I'm so thrilled how it turned out!  I have another swap reveal to share in the next week as well.  I'm so hooked on swaps now!  I'm finishing up 2 more swaps right now and have another one due in 2016.  

Be sure to follow me on Instagram to watch my swap progress and find out when new swaps start!

Friday, April 10, 2015

A Beginner Sewing Battlestation


Everyone has to start somewhere!  I'm not going to lie to you and tell you that sewing or quilting is a cheap hobby.  But it is a rewarding and useful skill.  I truly believe with some halfway decent tools and practice, anyone can learn to sew.

You will commonly see your sewing desk called a "battlestation" on many sewing forums and blogs.  If you are new to sewing, you don't need to spend a ton of money on the best machine or all the fancy sewing feet and cutting templates.  But there are a few places to invest.  One pair of scissors can last more than a lifetime, if they are the right pair and are taken care of.  Same with your thread snips.  I didn't include an iron in this list, since most people should have one that will work just fine as you get started. 

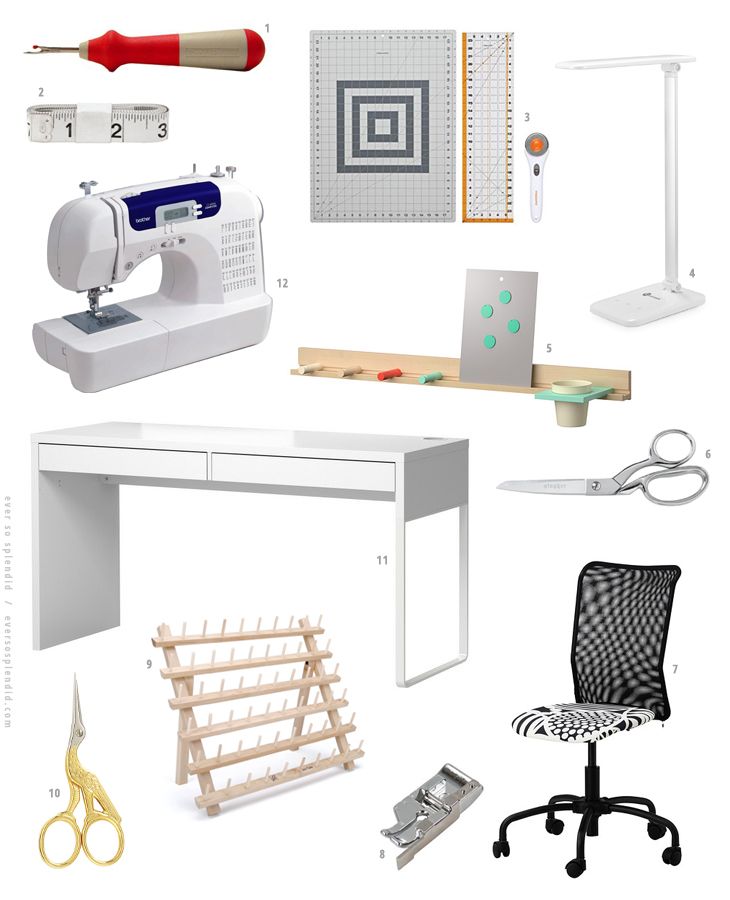
  1. SEAM RIPPER  ::  You might as well invest in a decent seam ripper now since it will be your friend for awhile.  I also have a cheap little one (I think it came with my machine) for getting into awkward spaces.  /  Fons & Porter Ergonomic Seam Ripper - $5.49
  2. MEASURING TAPE ::  If you are going to by buying patterns for yourself or measuring a quilt for binding, it's good to have a few of these laying around.  No need to spend a lot on them.  You will probably end up losing them or cutting them in half accidentally eventually.  /  Dritz Tape Measure - $4.92
  3. ROTARY CUTTING SET ::  People will probably fight me on this, but I think it's OK to start with a cheap beginner set like this when you first start.  They work fine and you can replace parts individually when you have coupons for a nicer cutting mat or OLFA cutter down the line.  /  Fiskars Rotary Cutting Set - $32.82
  4. WORK LAMP  ::  If you are like me and work a day job, you may end up doing a lot of your sewing in the dark.  A good desk lamp will be worth it.  An LED one like this, is great if you have to do any thread or fabric selection in the dark since it will give you truer colors that your standard lamp.  /  TaoTronics Elune Lamp - $32.99
  5. ORGANIZATION ::  Things can get out of hand really fast as your tool set and fabric collection start to grow, so stay organized from the very beginning.  My drawers are full or bowls and cups and organizers.  I use tones of plastic Ziploc bags to organize ongoing projects.  A wall rail for tools you need to keep close and handy is a great addition.  /  IKEA PS 2014 Wall Rail - $25.98
  6. SCISSORS ::  As I mentioned before, this is one of the places I would invest.  I have this pair (in a limited edition print) and they are wonderful.  Every other year I get them sharpened by a local knife sharpener and they always work beautifully.  /  Gingher 8-Inch Knife Edge Shears - $24.26
  7. DESK CHAIR  ::  Eventually you are going to want to invest in a nice chair.  What kind of chair is a very personal decision.  I don't like arms, but some people do.  A swivel base is very handy since you will likely be getting up to press and cut.  /  IKEA Torbjorn Chair - $39.99
  8. PIECING FOOT ::  If you are going to be quilting, this is a great tool as you learn.  This has a little piece of metal that helps you sew consistent 1/4" seams for piecing.  I still use this when I need to be very precise.  /  Patchwork Foot with Guide - $5.29
  9. THREAD RACK  ::  See #5.  Start organized and stay organized.  It will take you a long time to fill up a rack like this one.  Mine is much smaller and isn't even halfway full.  /  Thread Rack - $11.86
  10. THREAD SNIPS  ::  Another place it doesn't hurt to invest.  A good pair isn't terribly expensive and they will last you a long time.  I love these classic stork shaped snips.  They make me smile every time I reach for them.  /  Gingher Stork Embroidery Scissors - $13.98
  11. DESK ::  For years I just used my dining room table.  You really don't need to spend a lot of money on a desk.  Storage or cord management is a bonus.  Now I just use an inexpensive Ikea desktop and legs with drawers.  /  IKEA Micke Desk - $69.99
  12. SEWING MACHINE  ::  This is a place where I would find a happy medium.  Machines range drastically in price.  To start learning, I don't think you need to spend more than $200 on a machine.  A basic machine without all the bells and whistles will help you understand how to adjust tension and thread a bobbin.  This is actually the machine I am currently using.  Sure I would love more room in the throat or a little more speed, but this machine works and is affordable.  /  Brother CS6000i Sewing Machine - $147.81
What tools would you recommend to a new quilter or sewer?  What did I forget?  What item do you wish you had in your toolbox from the beginning?  Please share in the comments below!

Friday, March 6, 2015

Learning to Love Paper Piecing

Have you tried paper piecing?  I did a year or so ago and as much as I wanted to, I just couldn't fall in love with it.  It seemed tedious, messy and I just couldn't get into a groove.  I got frustrated and ended up throwing it into my scrap bin and calling it a day.  I was disappointed, but figured I'd just have to be happy with traditional piecing and english paper piecing.  But of course, I'm always dabbling and looking for something new to try.

Recently after running across a pin of a beautiful paper pieced block on Pinterest, I decided to give it another go. Since I've started joining a small handful or swaps, it felt like a good time to try.  Mini-quilts are perfect for practicing new techniques or blocks on a small scale. 

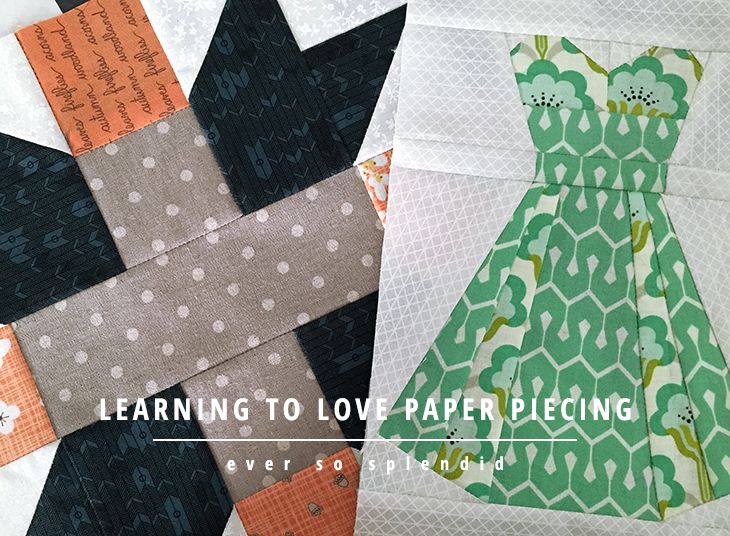
I started my journey with this tutorial on Sew What Sherlock.  I armed myself with a pile of scraps, a fresh needle and a large pot of tea.  The tutorial follows the Sister's Choice block, which is free in Sew What Sherlock's shop.  It's a fairly straight forward block, and could be pieced traditionally, but it would be time consuming and some of the intersection points would require extreme precision. 

This tutorial is great.  It is clear and easy to follow with great photographs and well written directions.  The technique took some getting used to.  I will admit I used my seam ripper a few times when I started, but with each piece it got easier and started feeling natural.  And the results speak for themselves.  the intersection points!  I can't get over those perfect corners!  I've never had such accurate corners with a block like this.

There are some cons.  You use quite a bit of paper.  I'll be buying a box of the cheapest copier paper I can just for this purpose.  Tearing off the paper carefully at the end takes time and is messy.  There is a little more waste than I'm used to.  But overall I'm hooked.

I've already purchased a new pattern and spent last night making a practice block.  I'm planning to use it for the Anna Maria Horner Mini Quilt swap on Intsagram.  I think it will be darling when it's finished.  Find the pattern by Charise Creates here.  Eventually I'd like to tackle Leonard the Llama by Sew What Sherlock.  I just need the right project.

Picking this technique up has opened a whole new set of doors and I can't wait to share some new projects with you.  I'm sketching some ideas for some original block designs that hopefully I'll have ready by summer.

Have you tried paper piecing?  Did you love it or hate it?  Please share your experiences and projects in the comments!

Tuesday, February 24, 2015

Cotton + Steel Mini Quilt Swap / The Plan

I'm doing my very first mini quilt swap.  I'm so nervous, but also terribly excited.  I have been issued my swap victim swap buddy and after relentless stalking research I have drafted a plan and ordered supplies!  I don't want to share too many specifics about their likes and dislikes, but I'm pretty pleased with the direction this is going and I do hope they like it.  It's going to be quite different from other minis they have received. 

I have chosen to work with the new Black & White collection that will be released in April (yay pre-order discount!!) and will be bringing in color through the binding and backing.  The paper piecing pattern is by Art School Dropout on etsy.  I think it's really going to show off the monotone fabrics to their fullest.  I'm debating on adding a border in the lightest fabric to frame it. 

I'm dying to start, but I'm glad the fabric wont arrive until April.  I have a lot on my plate to finish before I get this going.  You can follow my progress on this mini quilt and my other sewing and quilting projects on Instagram.

Are you a quilt swapper?  Any tips for a newbie like me?

Friday, February 20, 2015

Finally Finished Friday / Persimmon Patchwork Quilt


I started this one back in October.  I needed something that was easy and gratifying.  Plus I wanted to practice doing larger quilts on my little home machine.  One of my big resolutions this year is to finish some of my outstanding UFO's (unfinished objects).  I wanted to start with this one since it's HUGE and it's freezing here.

To finish it I ordered Linen Mochi Dot in Putty for the back and Gingersnap in Marionberry for the binding from Handmade is Heartmade on etsy.  The batting is my usual Warm & Natural.  I usually try to get it cut off the roll, but this deal on Amazon was too good to pass up. 

While it's fairly simple in design, it was the largest quilt I have finished.  It was challenging to get under the arm of my machine, but by the end I was getting the hang of the "stuff and fluff"method down. 


I'm thinking of doing another one with a whole bunch of Cotton & Steel charms from all their different collections, a real celebration of all of their patterns.  Watching this one come together so fast was just what I needed to re-motivate me for a great year of new quilting experiences and growth.  I'll call it my 2015 warm up!

Finnick is obsessed with this one.  If you follow me on Instagram, you know he's been curling up in it throughout the entire process.  As soon as I spread it on the bed to take some photos, he was up on top of it rolling around and smiling.  It only took 20 minutes before he was passed out on top of it. 


Friday, February 13, 2015

My Palette for the 2015 Mystery Quilt for a Cause

Last year I had a blast and met some awesome people when I participated in the first Mystery Quilt for a Cause hosted by Heather Spence and Missouri Star Quilt Company.  I made the Elevation Quilt for my grandmother, a cancer survivor. 

For those of you who are new to mystery quilts, you are given basic fabric suggestions and dimensions and every week the designer will share a new "clue" to help build your blocks.  The last week you put it all together to create your finished quilt top.  Everyone shares their progress in the forum.  I found the clues easy to follow, but if anyone has trouble, the group is more than willing to help. 

Once again, this years suggested donation is to Cancer Care.  You can find all the information and links to the donation, forums and pre-cut quilt kits here. 

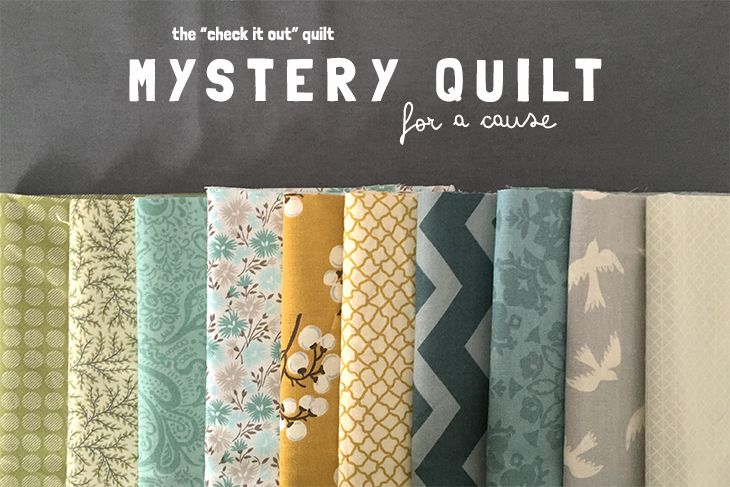
As usual, I chose to go the route of selecting my own fabric palette.  It wasn't easy.  My budget is limited right now, but I had to participate.  So I took my coupons down to Jo-Ann's and shopped for a good hour.  This is what I ended up walking out with.  It's not perfect.  I do have a directional fabric, and the scale on some of the patterns is a little larger than I would like.  Some of my "lights" could be lighter, and some of the "darks" could be darker.  I decided to try something different and use a steel gray for the background.  Overall I like the way it looks though, and I can't wait to see what the finished quilt top will look like.

I totally didn't realize that my palette was similar to last years.  Whoops!  I guess I know what I like.  I will probably either donate or gift this one when it's finished. 

To join in on this years Mystery Quilt for a Cause, visit Missouri Star Quilt Company.  The official start date is the 20th, but I think Heather might push back the first clue to the 22nd so people have time to get their kits in order.

Friday, January 30, 2015

Progress / 2015 New Years Day Mystery Quilt with Heather Spence


I know I have been totally MIA and I apologize for that.  Winter can be terribly unmotivating for me.  I have spent way too many nights lounging around with the dogs and I'm finally back at my machine with the fun new projects underway.   

This one is very nearly done being pieced.  It's the New Years Day Mystery Quilt by Heather Spence.  This time the donation was to the Family Renewal Shelter in Washington.  I was out of town when it started, but I started it as soon as I got home.  I think I'll be able to finish piecing the top by February.  The background is actually a subtle tone-on-tone design from the Cotton + Steel Basics collection.  It has so much depth.  I'm going to add a border from the scraps.  I can't wait to see it quilted.  I'm debating on using it to practice free motion quilting. but we'll see if I work up the nerve.  I have 2 other quilts to finish before I pick up the backing and batting for this beauty.


All my fat quarters and secondary background are from Bobbie Lou Fabric Factory.  Great prices and service.  Totally check them out.  They are getting all the new 2015 collections in now and have free shipping on order over $50.

Tuesday, November 18, 2014

The Frosted Pumpkin Stitchery / Christmas Cheer Sampler


It's been a long month.  Things seem to be settling down now (fingers crossed!) and I'm ready to get in the holiday spirit.  It's a little early.  I typically like to wait until Thanksgiving, but since I'm leaving on Christmas day to visit my family, I feel like starting a little sooner than usual.  Plus, I could use some cheer in my daily life.

I have had my eye on The Frosted Pumpkin Stitchery ever since I saw a few friends on Instagram start posting their progress photos of their Halloween projects.  When I saw people starting the new Christmas Cheer Sampler I knew this was my Christmas project.  I had dabbled in cross-stitch as a kid.  I never really finished any projects, but I did enjoy it.  I found a gallon bag of DMC embroidery floss in my basement (probably picked up from an estate sale years ago) and was able to get almost every color I needed for this project out of the bag.  The rest of the supplies, including the aida cloth, needles and hoop were just over $10 at my local craft store.

I'm running a little behind.  The next set of clues comes out on Friday and I have a long way to go to get last week's finished in time.  I already made one little error, but I don't think it will be noticeable in the end.


Add me on Instagram to follow my daily progress!  I'll be sure to post my finished project here with a complete review when I complete it.  I'm not sure if I want to put it in a frame or make it into a seasonal pillow cover.  Thoughts?

Are you doing any holiday projects this year?  I'd love to see what you are up to this season to get into the holiday spirit!  Please share in the comments.

Tuesday, October 28, 2014

In Progress / Persimmon Patchwork Quilt

I can't help myself.  I started another project.  This one is very simple though and I should be able to finish the top very quickly.  Sometimes you just need to get back to basics, and after relizing I really needed to work on accuracy and nesting my seams, I decided to do a very basic patchwork quilt, but try to be as accurate as possible.

I got a fantastic deal on a handful of charm packs in Persimmon by Basic Grey for Moda.  I had to supplement with a few charms from an Autumn Woods by Moda Charm Pack to get an even rectangle.  It's been really good practice and it's been fun to see it come together so quickly.  I'm planning to do a simple straight diagonal crisscross over the top to finish it.  I have no idea what I'll use to back and bind it, sometime inexpensive by soft.   


As a bonus, here is a little peek at what we have been dealing with for the last two weeks.  Logan had the brilliant idea to stick his foot through an old window and has been stitched and coned for 12 days.  The stitches came out this morning, but he needed another laser treatment and I couldn't help snagging a quick picture of him in his goggles. 

He's feeling much better, but we are ready to go back to normal life.  The cut on his foot is healing really nicely, but all he wants to do is run, wrestle and play.  Poor guy.  We are so thankful he is OK and for the support from our family and friends.

Hope you are having a beautiful autumn.  We are experiencing a little indian summer right now but are expecting storms tomorrow.  Please share what you are working on this fall!

Friday, October 24, 2014

Progress / Briar Rose Patch Quilt


I couldn't resist tearing into this jelly roll anymore.  I know I am supposed to be finishing things, but I needed to be inspired and this did the trick.

I purchased this Briar Rose by Heather Ross Jelly Roll in a summer sale for a steal.  I'm a huge fan of anything Heather Ross does and have quilted with her illustrative fabrics before.  As soon as I saw it I knew I had the perfect pattern for it saved in my pattern collection.  It's called 'Floral Bouquet' and it's from Jelly Roll Quilts by Pam Lintott and Nicky Lintott.  Instead of mixing up the fabrics for a scrappy look, I decided to isolate and highlight each of the fabrics in the roll. 

When it's finished it will be such a fun spring/summer twin sized piece.  I am thinking about saving up to have it long armed, but I may just go simple and do some straight line quilting on my machine if I'm really eager to see this one finished.  Thoughts?

I'm about 33% through the blocks.  Then the remnants will be used for a scrappy border and simple back (yet to be determined).  Of course I will be updating here along the way.

Tuesday, October 21, 2014

Crafting & Sewing Room Lamps


I need a lamp.  As the days get shorter, I do most of my sewing and crafting in the evening without natural light.  My sewing space has two options... a very dim lamp on the office side of the room and an obnoxious florescent ceiling fixture.  Neither is ideal.  So I need a lamp.  There are so many out there to choose from.  My budget is small and my desk is short on space.  I haven't found the perfect one for me yet, but I have found lots of options I love.

Whether you like ambient light from a table lamp or directional light from a work light, here are some of my favorites for crafting and sewing tables.  I have included a variety of prices and styles for sewing tables (and budgets) of all sizes.  Enjoy!
  1. Torna Lamp from Ikea  /  $69.99
  2. Glass Bottle Table Lamp from Overstock  /  $138.00
  3. Gavik Glass Lamp from Ikea  /  $14.99
  4. Clear Glass Table Lamp from Overstock  /  $98.99
  5. Arod Work Lamp from Ikea  /  $39.99
  6. Modern Banker's Lamp from West Elm  /  $129.00
  7. Modern Taupe Lamp from Pier 1 Imports  /  $59.99
  8. Vanadin Table Lamp from Ikea  /  $14.99
  9. Knubbig Cherry Blossom Lamp  from Ikea  /  $14.99
  10. Brushed Steel Desk Lamp from Overstock  /  $79.99
  11. Glass Table Lamp from Home Depot  /  $29.97
  12. Natural Wood Table Lamp from Home Depot  /  $90.00
  13. Nyfors Work Lamp from Ikea  /  $59.99

Tuesday, October 14, 2014

Halloween DIY Round-Up

We are entering the final two weeks before Halloween.  It's the perfect time to jazz up your front porch, and if you are hosting a party you should be starting to add some spooky to your home.  I confess we still don't have our pumpkins yet.  I have been so busy working on the two handmade costumes I'm committed to this year, so I haven't had any time to decorate. 

I've collected some of my favorite Halloween Decor tutorials from across the web. They range from super quick and easy to more elaborate.  I also included a range of styles from creepy to natural to quirky and fun.  Enjoy!
  1. Crochet Doily Spiderwebs from Country Living
  2. Vanilla Bean Skull Cake from The House that Lars Built
  3. Cat Face Garland from Country Living
  4. Calligraphy Pumpkins from Style Me Pretty
  5. Bat Mobile from Martha Stewart Living
  6. Foliage Decoupage Pumpkins from Poppytalk
  7. Sequin Polka Dot Pumpkins from Sugar & Cloth
  8. Plaster Hands from Martha Stewart Living
  9. Bat Anatomy Art from Lost & Fawned

Friday, October 3, 2014

Illustrations by Kendyll Hillegas

I've been busy working on my Halloween costume and one for my little nephew (from everyone's favorite movie... Frozen).  But in between projects I have been jazzing up and adjusting my new sewing space.  I'm falling in love with having a REAL space to do my work.  Eventually I want the wall behind the desk to be covered in functional storage (I'm thinking some of the wall storage bars from Ikea with some buckets and hooks) and inspirational art and images. 

The first step in this process was my new Cider Donut print from Kendyll Hillegas Illustration.  I met Kendyll through my other blog, Lost & Fawned when she approached me about hosting a giveaway.  Since then I have fallen in love with the way she captures food and ordinary objects. 

Be sure to stop by the giveaway on Lost & Fawned to enter to win a print of your choice from Kendyll.  Pick your favorite food to motivate you in your sewing room, or go more literal with some crafting tools.  Take your pick!  There is also an exclusive discount code available on Lost & Fawned. 

Happy Friday!  It's supposed to be rainy and gloomy here in the Midwest, so I'll be getting a lot of work done on the costumes and making some progress on the UFO's (UnFinished Objects) sitting on my sewing table.  What are you working on this weekend?

Tuesday, September 30, 2014

Quilt Pattern Round-Up

Like many of you, I not only have a weakness for stock-piling fabric, but I also have a drawer full of patterns.  I have more patterns than I will probably ever have time for, but I just can't help myself.  There is nothing like starting a new quilt and watching the blocks come together.  It's better than Christmas! 

Since I really shouldn't be buying any more patterns right now, I figured I would do some window shopping and share my favorites for you.  Enjoy!
  1. Endeavor by Freckled Whimsy  /  $9.00
  2. Suburbs by Cluck Cluck Sew  /  $8.45
  3. Radiance by Heather Jones  /  $12.45
  4. Archeology by Quilts by Emily  /  $8.50
  5. Button Up by Cluck Cluck Sew  /  $8.45
  6. Weave It To Me from Annie's  /  $8.98
  7. Modern Trellis by Must Love Quilts  /  $9.00
  8. Starlight by Thimble Blossoms  /  $8.95
  9. Chopsticks by Jaybird Quilts  /  $9.00
  10. Quarter Sections by Highway 10 Designs  /  $9.21
  11. Bright Birch Trees by Crazy Mom Quilts  /  $9.00
  12. Turkish Delight by Vintage Modern Quilt Pattern Co.  /  $9.00
  13. Three Flocks by Brigit Gail  /  $7.00

Friday, September 26, 2014

Taming my Sewing Table

I have been busy this week!  I've been keeping a horrible secret.  The photo at the top of this post depicts the state my sewing table has been in for over a year.  A mountain of unfinished projects and fabric scraps, totally unusable and out of control.  I've been spread out between the dining room table (for sewing), the coffee table (for cutting) and the living room (for ironing).  It was inefficient and a mess. 

Tuesday I decided to tame the beast.  I spent the entire day reorganizing the fabric, hanging the clothes and boxing up old hobbies for the basement.  I'm not kidding when I say to took an entire day to get what you see in the before and after above. 

It's still not finished.  I'm working out some kind of pegboard to organize thread and bobbins on the wall and need to make/find dividers to keep the drawers organized.  Plus Jared is going to help me add some shelves and a dowel in the closet for fabric storage and hanging unfinished projects.  I also want to make a cover for Finn cave (the crate by my desk).  It's his safe place to go when he is scared, so I can't get rid of it, but I'd like to make it a little less unsightly. 

I'm feeling much better now.  It's like a guilt-cloud that was hanging over me has finally lifted.  I've already fallen in love with the convenience of cutting, sewing and pressing all in the same space.  The new space has also inspired me to finally try free motion quilting.  I had the tools, I just need the practice.  I finished my first pot holder and have already learned a lot.  If I can nail the technique I think I may finish my Jitterbug Betty Quilt this way. 

Do you have a space to sew?  I'd love to see it!  I need inspiration to finish my space and make it as functional and inspiring as I can.  Please share in the comments...

Friday, September 19, 2014

On my Sewing Table


I've been working hard today on a couple of projects I will hopefully be able to share soon.  The first is my halloween costumes, a comic book dress from the Butterick pattern B4790.  It's looking so cute!  I had to make some modifications since I cut the pattern one size too small (this one actually seems to be true to the measurements on the pattern).  I also decided to do the bias tape more like how I would finish a quilt, but hand stitching the inside for a nice clean finish.  I'm so proud of the darts on this dress. they lay perfectly.  It's going to be such a fun piece.

The other little project I'm working on is a pair of quilted pillow covers with a scrap pack from Skinny Laminx.  I'm finished the top of one (which you can preview on my instagram account) and I'm considering doing and English paper pieced hexagon pattern on the other.  I'm still debating if I should finish these with a zipper or an overlapping back.  Thoughts?

What are you currently working on?  Something for halloween?  Already starting Christmas gifts?  Please share!

Saturday, September 13, 2014

Fall Sewing Wishlist


As I start to plan my fall sewing projects, I have been going through my wishlist to add a few new tools to my arsenal.  I thought it would be fun to give you a little peek at the sewing tools and patterns I am dying to add to my toolbox this autumn. 
  1. Focal Quilt Pattern by Carolyn Friedlander  -  I'm still working on lining up my fall projects and I would love to take some something very modem and a little more challenging.  This pattern totally fits the bill.
  2. Dritz Magnetic Pin Caddy  -  Lately I have not been able to keep my pins in check, which is of course dangerous since we don't wear shoes in our house.  This magnetic pin caddy is perfect and one of my favorite colors, minty green!
  3. Cami Collared Dress Pattern by Pauline Alice  -  This dress would be so cute in plaid with contrast cuffs and collar.  I can just see myself wearing it with tights and boots to go pick pumpkins and drink cider.
  4. Fully Pinnable Female Dress Form  -  As my garment sewing progresses, I am starting to wish I had a dress form.  It would be easier to throw it over the form to pin and alter instead of stripping down and trying to pin on my own body (have you ever tried to pin your own shoulder straps?  Yikes!).
  5. The Colette Sewing Handbook  -  I checked this one out from the library and immediately added it to my wishlist.  It's a great book for the beginning garment sewer to have on hand.
  6. Fons & Porter Hexagon Ruler  -  I really want to take on a hexagon quilt this fall.  This is a great multi-size ruler to help make consistent hexagons.
  7. 3-Pack Fabric Measuring Tape  -  I ALWAYS lose my measuring tapes.  This 3-pack is cheap and you can stash one by your computer (for pattern ordering), in your junk drawer and in your sewing table.  
  8. Classic Stork Embroidery Scissors  -  I have some practical snips, but these ones are just so pretty.  I would love to keep these in my portable sewing kit.
What tools are you lusting after right now?  Any new tools in your toolbox that you would recommend?  What is your favorite investment in your sewing arsenal?  Please share in the comments!  Have a great weekend!

Thursday, September 11, 2014

The Plan / Halloween in Butterick B4790


Even though I haven't quite finished with my last sewing endeavor, I am taking a quick detour to work on a Halloween costume.  It all started when I found this licensed Marvel Comic print at Joann's.  I had to do SOMETHING with it.  One of our dogs is named after a Marvel character (Logan, aka Wolverine) and Jared has love Spiderman forever.  He has dressed up as both characters for Halloween on multiple occasions.  So I figure it's my turn!

I'm going a little more abstract, and making a retro style dress which will be paired with a black super hero mask and maybe some elbow length pleather black gloves.  I have had B4790 in my drawer for awhile after I snagged it at a $1.99 pattern sale and it seems like the perfect pattern for this costume.  It's SUPER easy (only 4 pattern pieces to cut!) and reviews I have read says it come together fairly quickly.  I will be using solid black from the front panel and red bias tape for the finishing.  So far it seems to run pretty true to the sizing on the packaging (which doesn't work to my advantage since I made the decision to size down).

I can't wait to finish this one and show it off.  I'm pretty excited to work with such a fun fabric.  Are you making a halloween costume this year for you or anyone else?  Please share!  I'd love to know what you are creating!

Tuesday, September 2, 2014

September DIY Round-Up


Happy September!  This is going to be the busiest month of the year for me but after the 20th things should calm down just in time for fall weather to start setting in.  Here is a quick round-up of some DIY projects perfect for September.  Enjoy!
  1. Marbled Contact Paper Envelopes on Fall for DIY
  2. Pom Pom Pillows on Martha Stewart
  3. Watercolor Mug on Poppytalk
  4. Sequin Phrase Sweatshirt on A Beautiful Mess
  5. Pom Pom Throw Blanket on Sugar & Cloth
  6. Geometric Cement Paperweight on Design Sponge